Embedded checkout and card fields
Take a payment inside your own page, with Vezmo's embedded checkout (vezmo.js) or with card fields you place in your own form (vezmo-elements.js), covering trusted origins, the client token, browser events, wallets, pay-later methods that finish outside the frame, appearance and knowing the result.
Overview
Two ways keep your customer on your own page while Vezmo collects the payment:
- Embedded checkout (
vezmo.js): Vezmo's payment form inside your page, in a frame. You add a container and your own Pay button. - Card fields (
vezmo-elements.js): you build the checkout form, and mount Vezmo's secure payment field in it, or separate fields for the card number, expiry date and security code.
Both start the same way as hosted checkout: your server creates a checkout session. Card details are typed into Vezmo's fields and never reach your page's code or your servers.
Not sure which one fits? Choose how to take payments compares every option.
Compare the two
| Embedded checkout | Card fields | |
|---|---|---|
| Script | vezmo.js | vezmo-elements.js |
| What you build | A container on your page and your Pay button. | Your own checkout form, with Vezmo's field (or the three card fields) inside it. |
| Ways to pay | Cards, Apple Pay and Google Pay, and every other method you've turned on that fits the payment. | The all-in-one field: cards, Apple Pay and Google Pay, US bank payments and pay-later methods. The three card fields: cards only. |
| Your customer's details | You send them when you create the session. The frame asks only how they pay. | The same. You can add a billing address field. |
| Result in the browser | Events, such as success, pending and error. | confirm() answers with a status. |
| Your site in Trusted origins | Required | Required |
1. Add your site to Trusted origins
The embedded checkout loads only on the websites listed in Developers › Trusted origins, and only sends its events to them. Card fields work only from those websites too.
Open Trusted origins
Go to Payments › VezmoPay, then Developers, and open the Trusted origins tab.
Add your site
Type your site's origin, like
https://yourstore.com, and select Add origin. Use the scheme and the domain only: no path, no wildcards.https://www.yourstore.comandhttps://yourstore.comare two origins; add each one your checkout runs on.
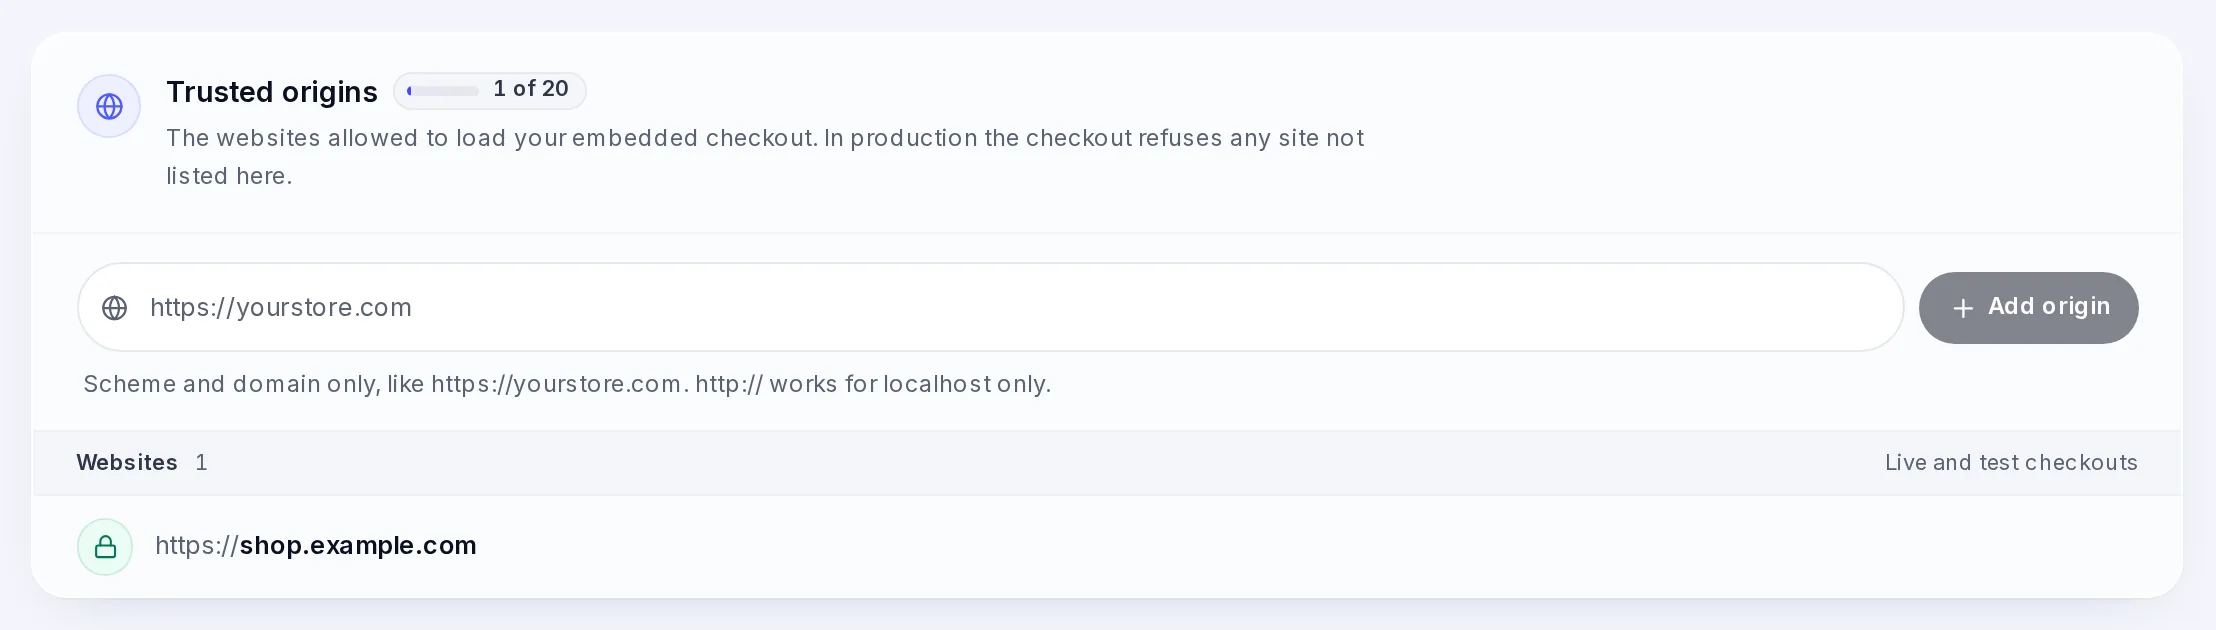
- An origin must start with
https://. - One list serves your test and live checkouts.
- The list belongs to your business: every teammate's sessions use it.
- Until your site is listed, the browser refuses to show the frame on your page, and no events arrive.
2. Create a session on your server
Your server creates the session with POST /merchant/secure-payments, exactly as for
hosted checkout: the order's title, amount and currency,
and your customer in client. Send the customer's name, email, country and postal code there: neither the frame nor
the card fields ask for them.
From the answer, pass data.securePayment.clientToken to your page. It is a short-lived token for this one payment:
- It works for
ttlMinutes(30 minutes by default, up to 24 hours). - It can't change the amount, the currency or the customer.
- It isn't a key. Your API key and secret stay on your server.
Request and response examples: Secure payments.
3a. Embedded checkout
Load vezmo.js from https://api.vezmo.com/api/v1/vezmo.js on your checkout page, mount the checkout into a
container with the client token, and call pay() when your customer selects your Pay button. Load the script from that
address each time; don't copy it to your own server, so fixes reach your checkout without a change on your side.
The frame resizes itself to fit the form. Its look follows the session's theme (light, dark or auto), or the
theme you pass when you mount it.
Browser events
The checkout tells your page what happens. With vezmo.js you listen with on(); the SDK only passes on messages from
the frame it created.
| Event | What it means |
|---|---|
ready | The form has loaded. |
processing | The payment is being confirmed. Keep your Pay button disabled. |
success | The payment succeeded. Usually carries paymentId and transactionId. |
pending | A bank payment was submitted. It settles in a few business days. |
error | The payment was declined or failed. The customer can try again in the same form. |
action-required | The customer has one more step in a window the checkout opened, such as a pay-later method. Not final: success, pending or error follows. |
expired | The client token expired. Create a new session. |
already-paid | This payment is already complete. Don't charge again. |
Every event name, with its fields and a raw-frame example: Event reference.
Apple Pay and Google Pay
The wallet buttons show at the top of the form when your customer's device supports them. A wallet charges as soon
as the customer approves it in the wallet sheet, without your Pay button. If your page creates its order before it
charges, mount with wallets: 'authorize' and answer in your onWalletAuthorized() handler: nothing is charged unless
it says yes, and without a handler every approval is cancelled. wallets: false hides the buttons on that page. Details:
Wallet buttons.
Pay-later methods in the frame
Klarna, Affirm, Afterpay and Amazon Pay can't run inside a frame. When your customer picks one, the form shows a
button, like Continue to Klarna, that opens a secure window on that method. Your page gets action-required, then success (or pending)
when they finish there. If they select your Pay button with one of these chosen, nothing is charged.
Some cards also need a step outside the frame (3D Secure, a card check): the checkout opens a secure window for it on the customer's click, and the usual event follows.
3b. Card fields
Load vezmo-elements.js from https://api.vezmo.com/api/v1/vezmo-elements.js, open the session with the client
token, and mount one of these into your own elements:
- The payment field: one field that offers every method the session allows, laid out as tabs or as a list.
- Split card fields: the card number, expiry date and security code, each in an element of your own. Cards only, and you can't mix them with the payment field on one page.
- A billing address field, optional, beside either one.
When your customer pays, confirm() sends what they chose to Vezmo, and Vezmo's server prices and confirms the
payment: nothing is confirmed in the browser. It answers with a status: succeeded, processing (a bank payment
on its way), requires_verification (a bank account typed in by hand, waiting for your customer to confirm small test
deposits: it carries the paymentId and the verify link), or failed, with an error message to show. 3D Secure opens
in your page when the bank asks for it.
When your customer may pay in their own currency, ask them which currency they want and pass their choice with
chooseCurrency() before confirm(): until then, confirm() answers with the error currency_choice_required.
Every function and option, with examples: Elements.
Pay-later methods with card fields
With card fields, Klarna, Affirm, Afterpay and Amazon Pay take your customer to the method's own page and back to a
returnUrl of yours. Pass returnUrl to confirm() for every payment: without it, these methods fail before anything
is created. On the return page, open the same session again and call handleReturn() to read the result.
Appearance
Pass appearance to match your brand: a light or dark theme, your main colour, corner radius and font, and finer rules
for the field's parts. Without it, the field follows the session's theme.
4. Fulfil from the webhook
A browser event or a confirm() result tells your page what to show. It is not proof of payment: ship the order when
your server receives payment.success for that paymentId, or after GET /merchant/payment/:id reads
"state": "succeeded". See Fulfil from the webhook and
Webhooks.
A bank payment ends in the browser with the pending event (embedded checkout) or the processing status (card
fields), and payment.success reaches your server only when it settles, a few business days later. Don't ship before
that.
Test it
Use a test key and the test cards: 4242 4242 4242 4242 succeeds, and
4000 0000 0000 3220 asks for 3D Secure. With a test session, the form shows an orange Test mode mark.
Questions
The frame is empty on my page
Your site's origin isn't in Trusted origins, or it is spelled differently (www., another port). Add the exact
origin your page runs on.
Can I style the embedded checkout?
You choose its theme (light, dark or follow the device) and the size of its container. To style the payment field
itself, use card fields with appearance.
Do I still need the webhook?
Yes. A customer can close the page after paying, and a bank payment settles days later. The webhook reaches your server either way.
Does the frame ask for my customer's name and address?
No. It asks only how they pay. Collect the details on your own form and send them in client when you create the
session: its name, email, country and postal code are then required.
Related
Facts checked against the product on 9 Nov 2026.
Was this page helpful?
Go-live checklist
What to check before your integration takes real payments, covering approval and a live key, the key's expiry date, https redirects, trusted origins, a subscribed and verified webhook endpoint, branching on livemode, mobile app registration and a small live test.
WooCommerce
Take payments in a WooCommerce store with the VezmoPay plugin, covering installing it, Connect with VezmoPay (and the API key it replaces), the three integration modes, test and live, manual setup, how orders are completed, refunds, and what the plugin doesn't support yet.